

Once upon a time, microcomputers were simple and easy to understand. So simple in fact that a kid like me, with no computer experience whatsoever, could actually understand them, build them, program them, and put them to work in his very own projects! The first microcomputer that I built (and actually got to work) was the COSMAC 'ELF', featured in the August 1976 issue of Popular Electronics magazine. It used the RCA 1802; an exceptionally easy to use microprocessor. The ELF taught me about computing, and got me started on a career in engineering.
Today's computers are far more powerful than the 1802. But they have also become so complicated that virtually no one can build them or truly understand how they work. I decided to do something about it. The Membership Card is a reproduction of the original Popular Electronics Elf computer, repackaged to fit in a pocket-sized Altoids(R) tin. It uses no custom parts, no surface mount, and there is no need for PCs, megabyte compilers, or secret software to use it. Now you can learn about computers right from the ground up, and really understand how they work!


The 1802 Membership Card is available in kit form, bare boards, or just download the manual and build it yourself from scratch. Click here for more information, or to order parts, boards, or a complete kit!

Want something even smaller and cheaper? The 1802 MemberCHIP card is half the size of the regular Membership Card, and fits in a tiny Altoids Smalls(R) tin. Yet this Itty Bitty Computer is entirely built with vintage 1980's parts and through-hole technology.
How did we get it so small? Here's the trick: It uses just one PC board, but with parts mounted on both sides, to effectively double the space. They are carefully positioned so their pins miss each other, and yet are accessible for soldering. Despite the size, it has bigger pads, larger spaces, and wider traces than modern PC boards to make it easy for even beginners to build.

News flash: The MemberCHIP Card was a finalist in the Hackaday "Re-Engineering Education" contest! Details and lots more information on the MemberCHIP Card are at Hackaday.io
The 1802 MemberCHIP Card is available as a complete kit. I'm still adding to the manual, so let me know what you think, and with any ideas for applications or improvements!
Here's a Z80 version of the Membership Card! Introduced in 1976, the Z80 became one of the most popular microprocessors of all time. It quickly replaced the Intel 8080, and was used in many classic microcomputers like the Osborne O1, Kaypro 4, Radio Shack TRS-80, Heathkit H89, and more. And it's still in production today, in the "secret heart" of products where modern micros would simply be vast overkill (for example, the Texas Instruments TI-84 calculator).
The Z80 Membership Card is a complete computer that fits in an Altoids tin. Inspired by the Heathkit H8 computer, it is thoroughly documented and easy to build, with big parts, big pads, and big traces and spaces. It uses only classic generic parts common in the 1980s -- no custom parts, and no surface mount. BASIC is included in ROM, so it's completely self-contained: You don't need a PC, Windows, megabyte compilers, or secret software to use it. Now you can learn about computers right from the ground up, and really understand how they work!


By itself, the Z80 Membership Card is a stand-alone computer to "power up" your projects, like the Arduinos or Parallax BASIC Stamps. Both Monitor and BASIC communicate via the serial port. It also has a full expansion bus to add memory and I/O cards ("shields") to put it to work.
The Z80 Front Panel Card plugs onto the Z80 Membership Card to add a hex keypad, 7-digit hex display, piezo beeper, timer, and TTL/RS-232 serial I/O port. The Z80MC program in EPROM uses the front panel to provide a sophisticated machine-level monitor. Even without connecting to a PC or other computer, you can:
A unique feature of the ZMC monitor is that it remains active even while your program is running. It can continuously display the contents of a register, I/O port, or memory location, so you can see when your program is modifying it.
The serial port sends and receives data at 9600 baud. Plug it into a terminal, or PC running a terminal emulation program like Hyperterm. With this, you can type the Z80MC monitor commands on the PC keyboard, and see the results on the PC's screen. You can also upload and download data and programs as simple ASCII text, or Intel HEX files, or XMODEM formats.
The Z80-SIO card adds up to 512k of bank-switched RAM, a second UART serial port, and a Compact Flash card to provide "disk" storage. With this card, the Membership Card runs the CP/M-80 operating system.
The entertaining "retro" manual has detailed assembly instructions, schematics, parts lists and sources. Click here for more information, or to order parts, boards, or a complete kit!

Now there's an 8080 version of the Membership Card! It's the Altaid 8800, a tribute to the MITS Altair 8800 that arguably started the microcomputer revolution in January of 1975. It set the pace that launched a thousand chips, creating hundreds of new companies that brought computers to all of us.
The Altaid 8800 is a complete computer, with a real 8080 CPU that fits in an Altoids tin. It's built entirely with classic generic parts common in the 1980s; no modern ICs, surface mount, or custom parts at all. Like the original, it has a fully functional front panel complete with switches and blinkinlights. Yet amazingly, it all fits in a pocket-sized Altoids tin.
The manual mimics the hobby electronics magazines of the time, to provide a sense of what it was like to build a pioneering project like this at the dawn of the microcomputer age.
The computer is built as a 2-card set. The CPU/Front Panel card is on top, with the 8080 front and center for all to see. It also includes the LEDs and switches to provide a binary front panel, which can examine, change, and run programs in memory, just like the original Altair 8800.
The second is the Memory/Input/Output card. It provides the RAM and ROM memory, plus serial and parallel input and output ports. Together, the two boards produce a fully functional computer which can run a monitor, BASIC, or even a complete CP/M operating system with 524k of "disk" storage.


![]()
Click here for more information, or to order parts, PC boards, or a complete kit!

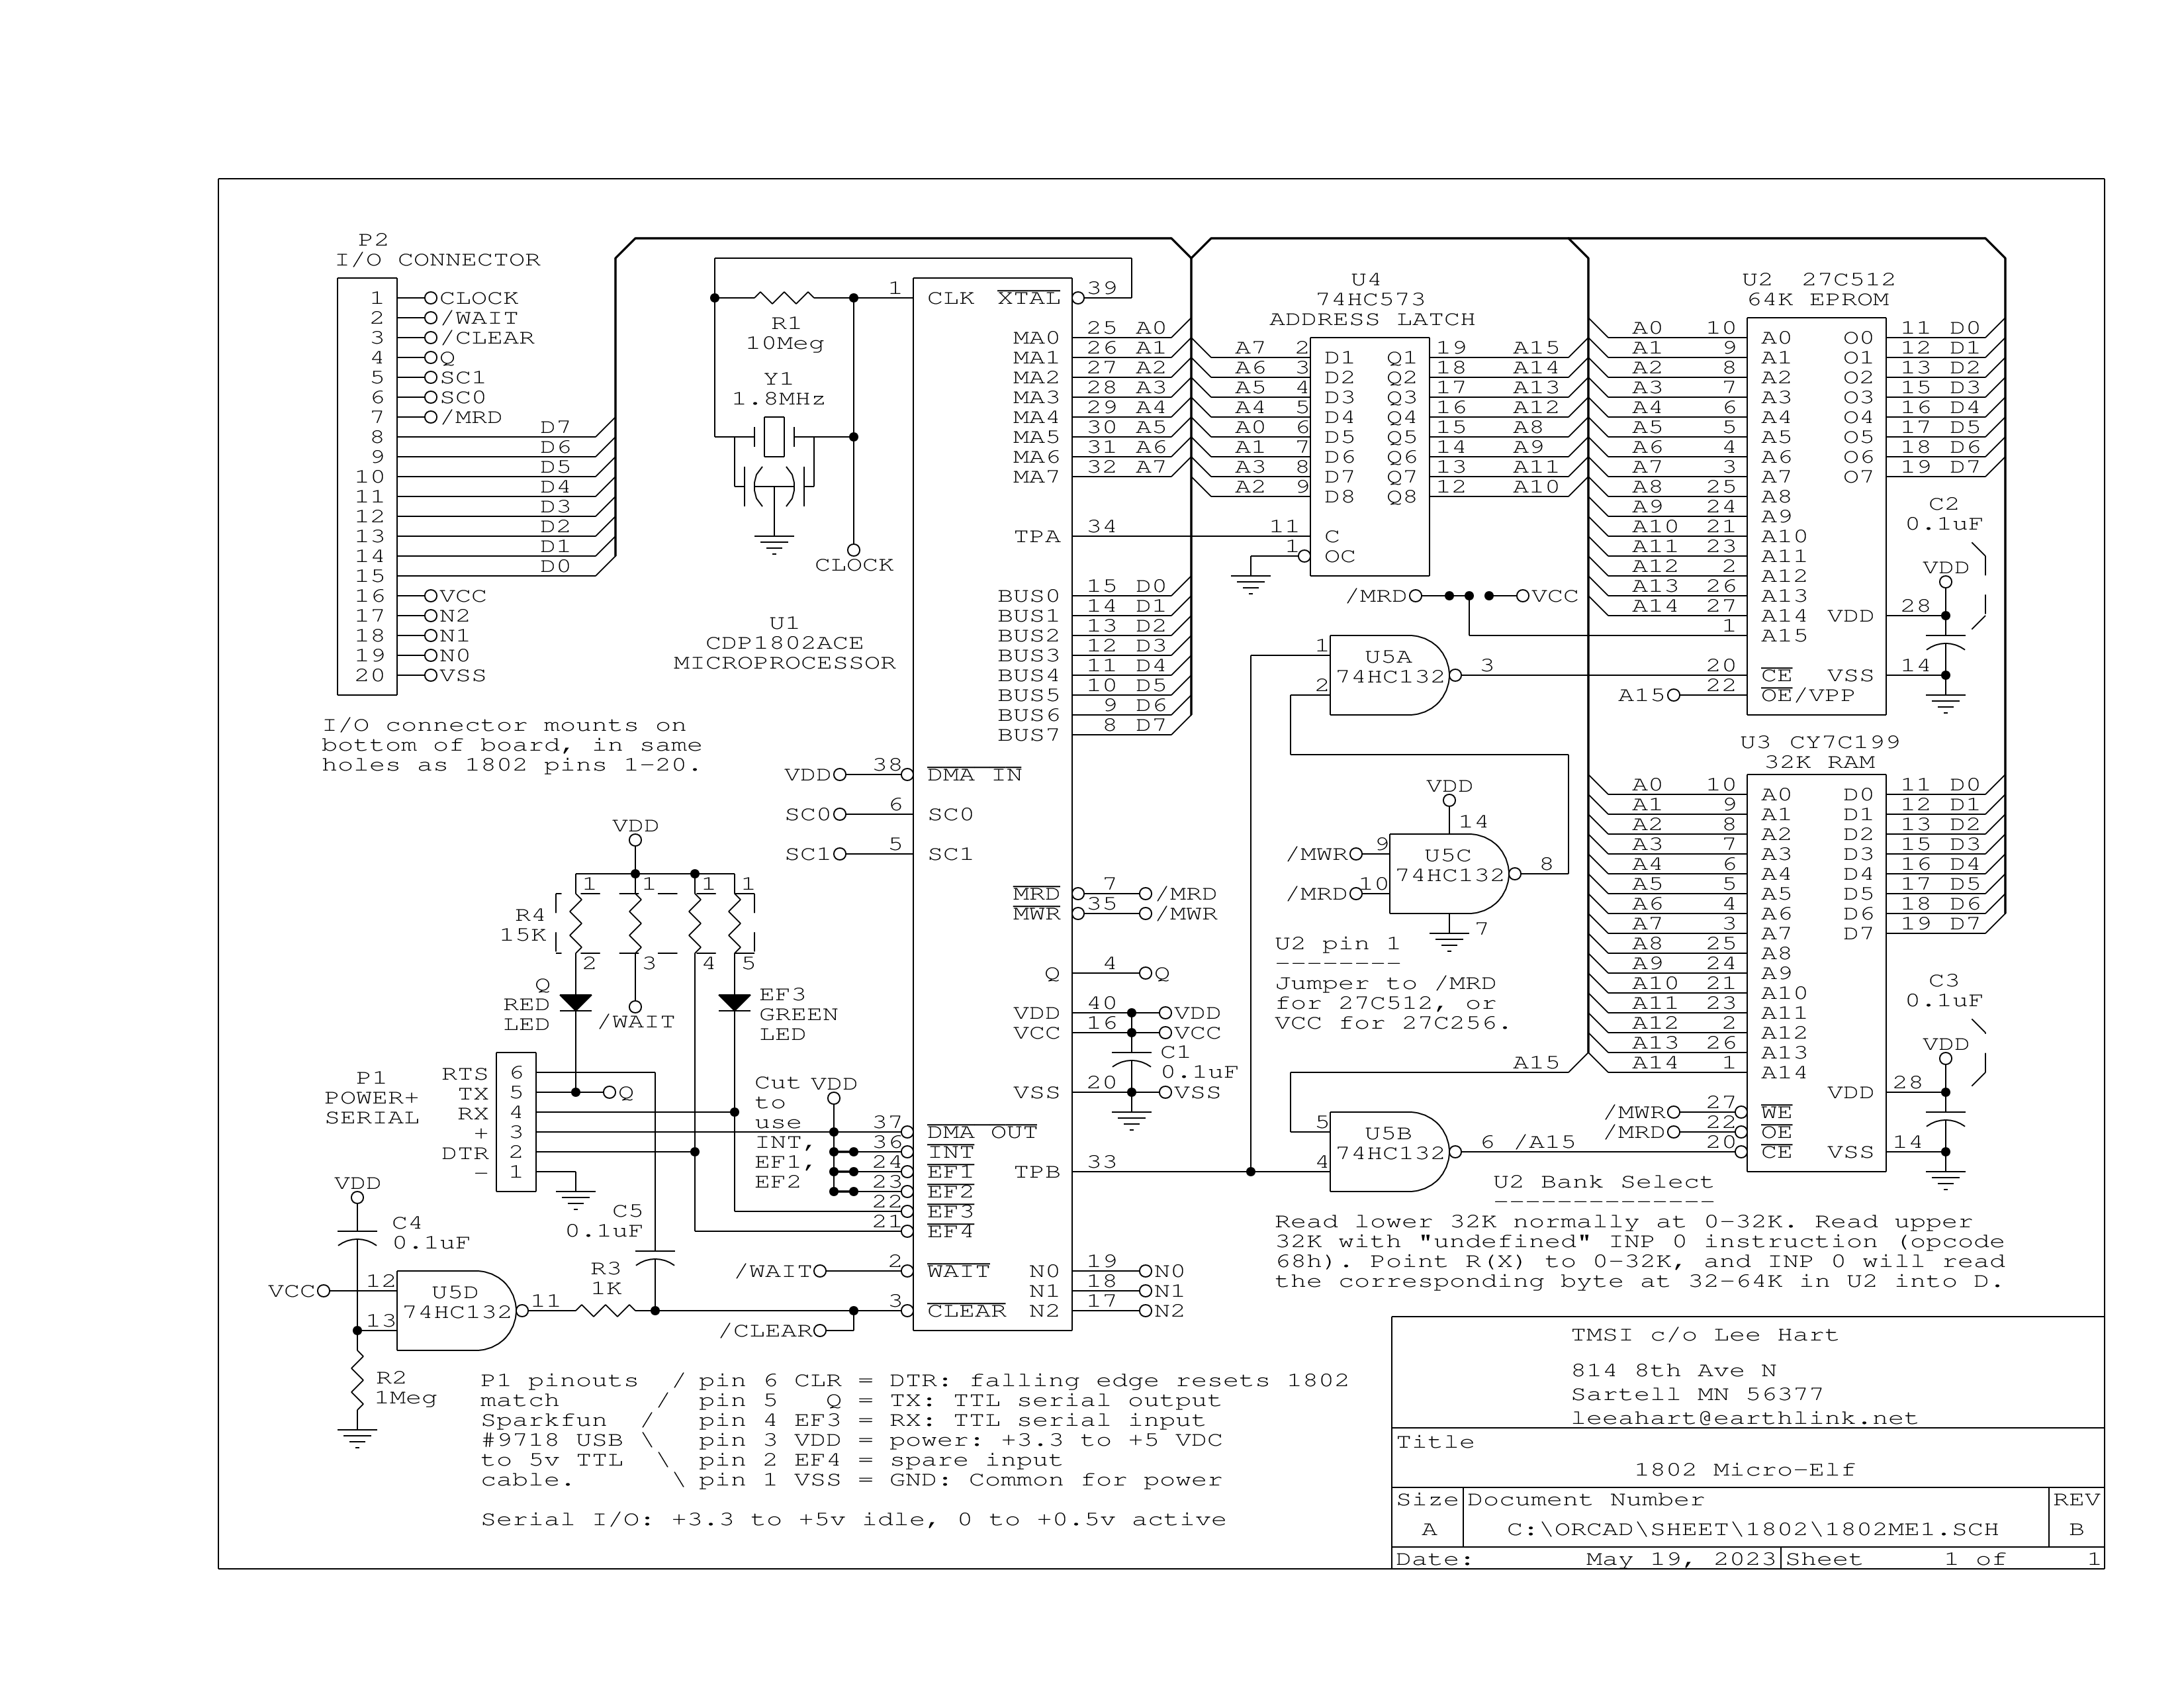
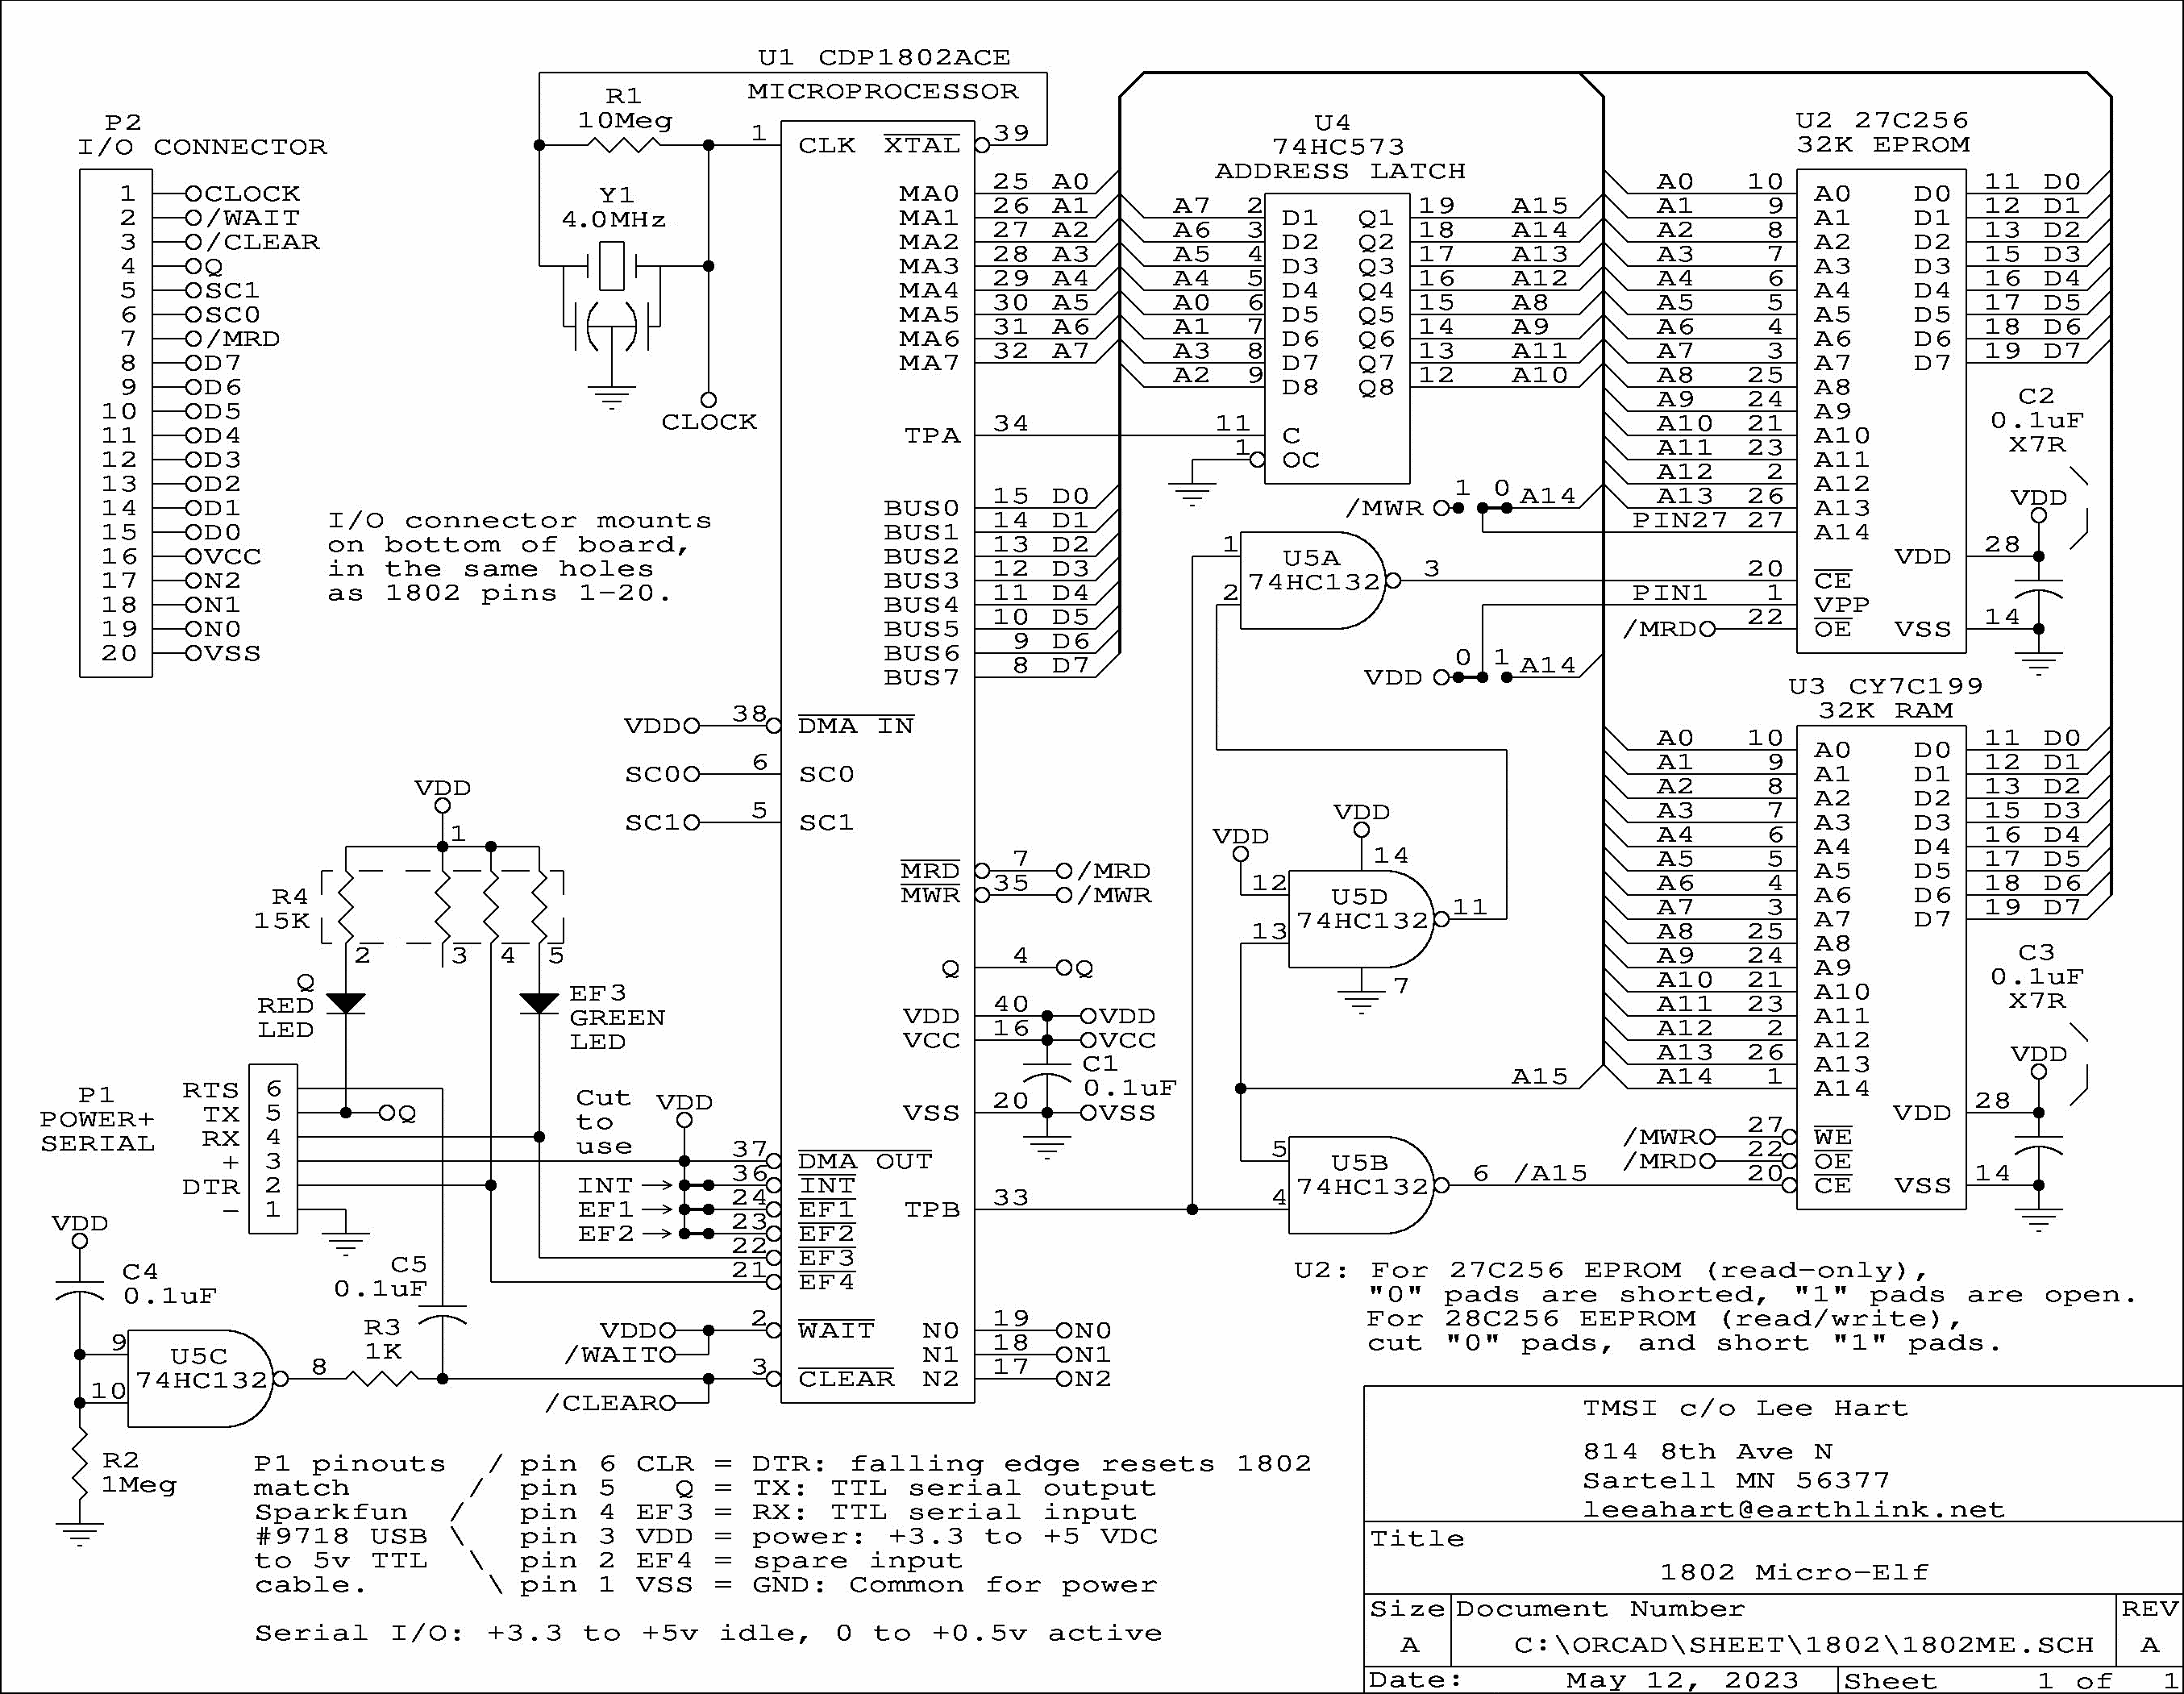
The RCA VIP was designed by Joe Weisbecker as an elegantly simple home computer that was easy to learn and fun to use. Announced in 1977, it had an RCA 1802 microprocessor, 2K (or optionally 4K) of RAM, a monitor program in ROM, a 16-key hex keypad, a 64x128 pixel graphics video display, and a serial port to load/save its programs on cassette tapes. That's an original VIP on top of the monitor in the photo.
For the 40th anniversary of the VIP, we made a new version you can build yourself. That's it at the bottom of the photo, hiding under its tiny keyboard! The battery box is at the right, with four AA cells to power it. Our version has the same 1802 microprocessor, but with significant upgrades in speed, memory, and features:

The computer is based on the COSMAC Elf and 1802 Membership Card, so the same software works with little or no change. For example, our first program was the 1802 Membership Card's serial Monitor ROM. The current kit comes with the MCSMP20 Monitor, RCA BASIC3, and CHIP8 programming language, using the VIP2K's keyboard and video, and serial port for load/save.
The manual is pretty basic, but should be enough if you're a skilled kit builder. Bare boards are available, and the parts are all generic and easy to get (no rare, expensive, or custom parts); but you'll need to be able to program your own EPROMs. Or order a kit, which comes with everything, including EPROMs programmed with the latest software. Click here for more information, or to order parts, boards, or a complete kit!

If you've never built anything with a microcomputer, here's your chance. This project will show you just how simple a microcomputer can get. It may also be the silliest use for a microcomputer yet! The photo shows it with a holiday hat sitting under the Christmas tree.
I designed this back in 1978 to randomly blink a set of LEDs with the classic RCA 1802 microprocessor. I realized I could arrange the LEDs to form a face. The eyes roll left and right, and blink. The eyebrows raise and lower, and the mouth smiles, frowns, opens, and closes.
How does it work? The LEDs are connected to the microprocessor's address, read/write, and state code lines. The program... well, there is no program! The 1802 has no internal memory (no RAM and no ROM). The data bus is left floating, so it fetches random values, and executes them as if they are a "program". One of the data lines is pulled high; this prevents the data bus from ever being 00, which is the HALT instruction.
The 1802 is being clocked at 1 Hz, so the expressions slowly change. That's not MHz or GHz; 1 Hz is one cycle per second! Let's see you find another microcomputer application that runs this slowly.
The Face Card is available as a complete kit, a bare board, or click here to download the manual in PDF format, complete with schematics and parts list. The kit comes with the 36 red, yellow, and green LEDs, the 1802 microprocessor, and everything else that goes on the board. All parts are thru-hole (no surface mount), and all pads and spacings are large and well spaced for easy soldering. Add a 4-6 volt power source (four AAA batteries, for example), and you're finished!
The board measures 3.5" by 2" (9mm x 5.4mm) and fits perfectly in an Altoids candy tin, with room for a 4-cell AAA battery holder for power. A pushbutton switch is included to turn it on when you open the lid, to surprise your friends when they reach for a mint. :-)
Jeff Duntemann reviewed the Face Card on his blog here. Jeff is famous in the 1802 world as the author of Captain Cosmo's Whizbang and his Cosmo Klein 1802-based robot and other projects built way back in 1976-81.


It's become fashionable to have "badges" for the various computer shows. These are wearable projects to show off your skills and interests. Most of these are pre-built and use the very latest high-tech components.
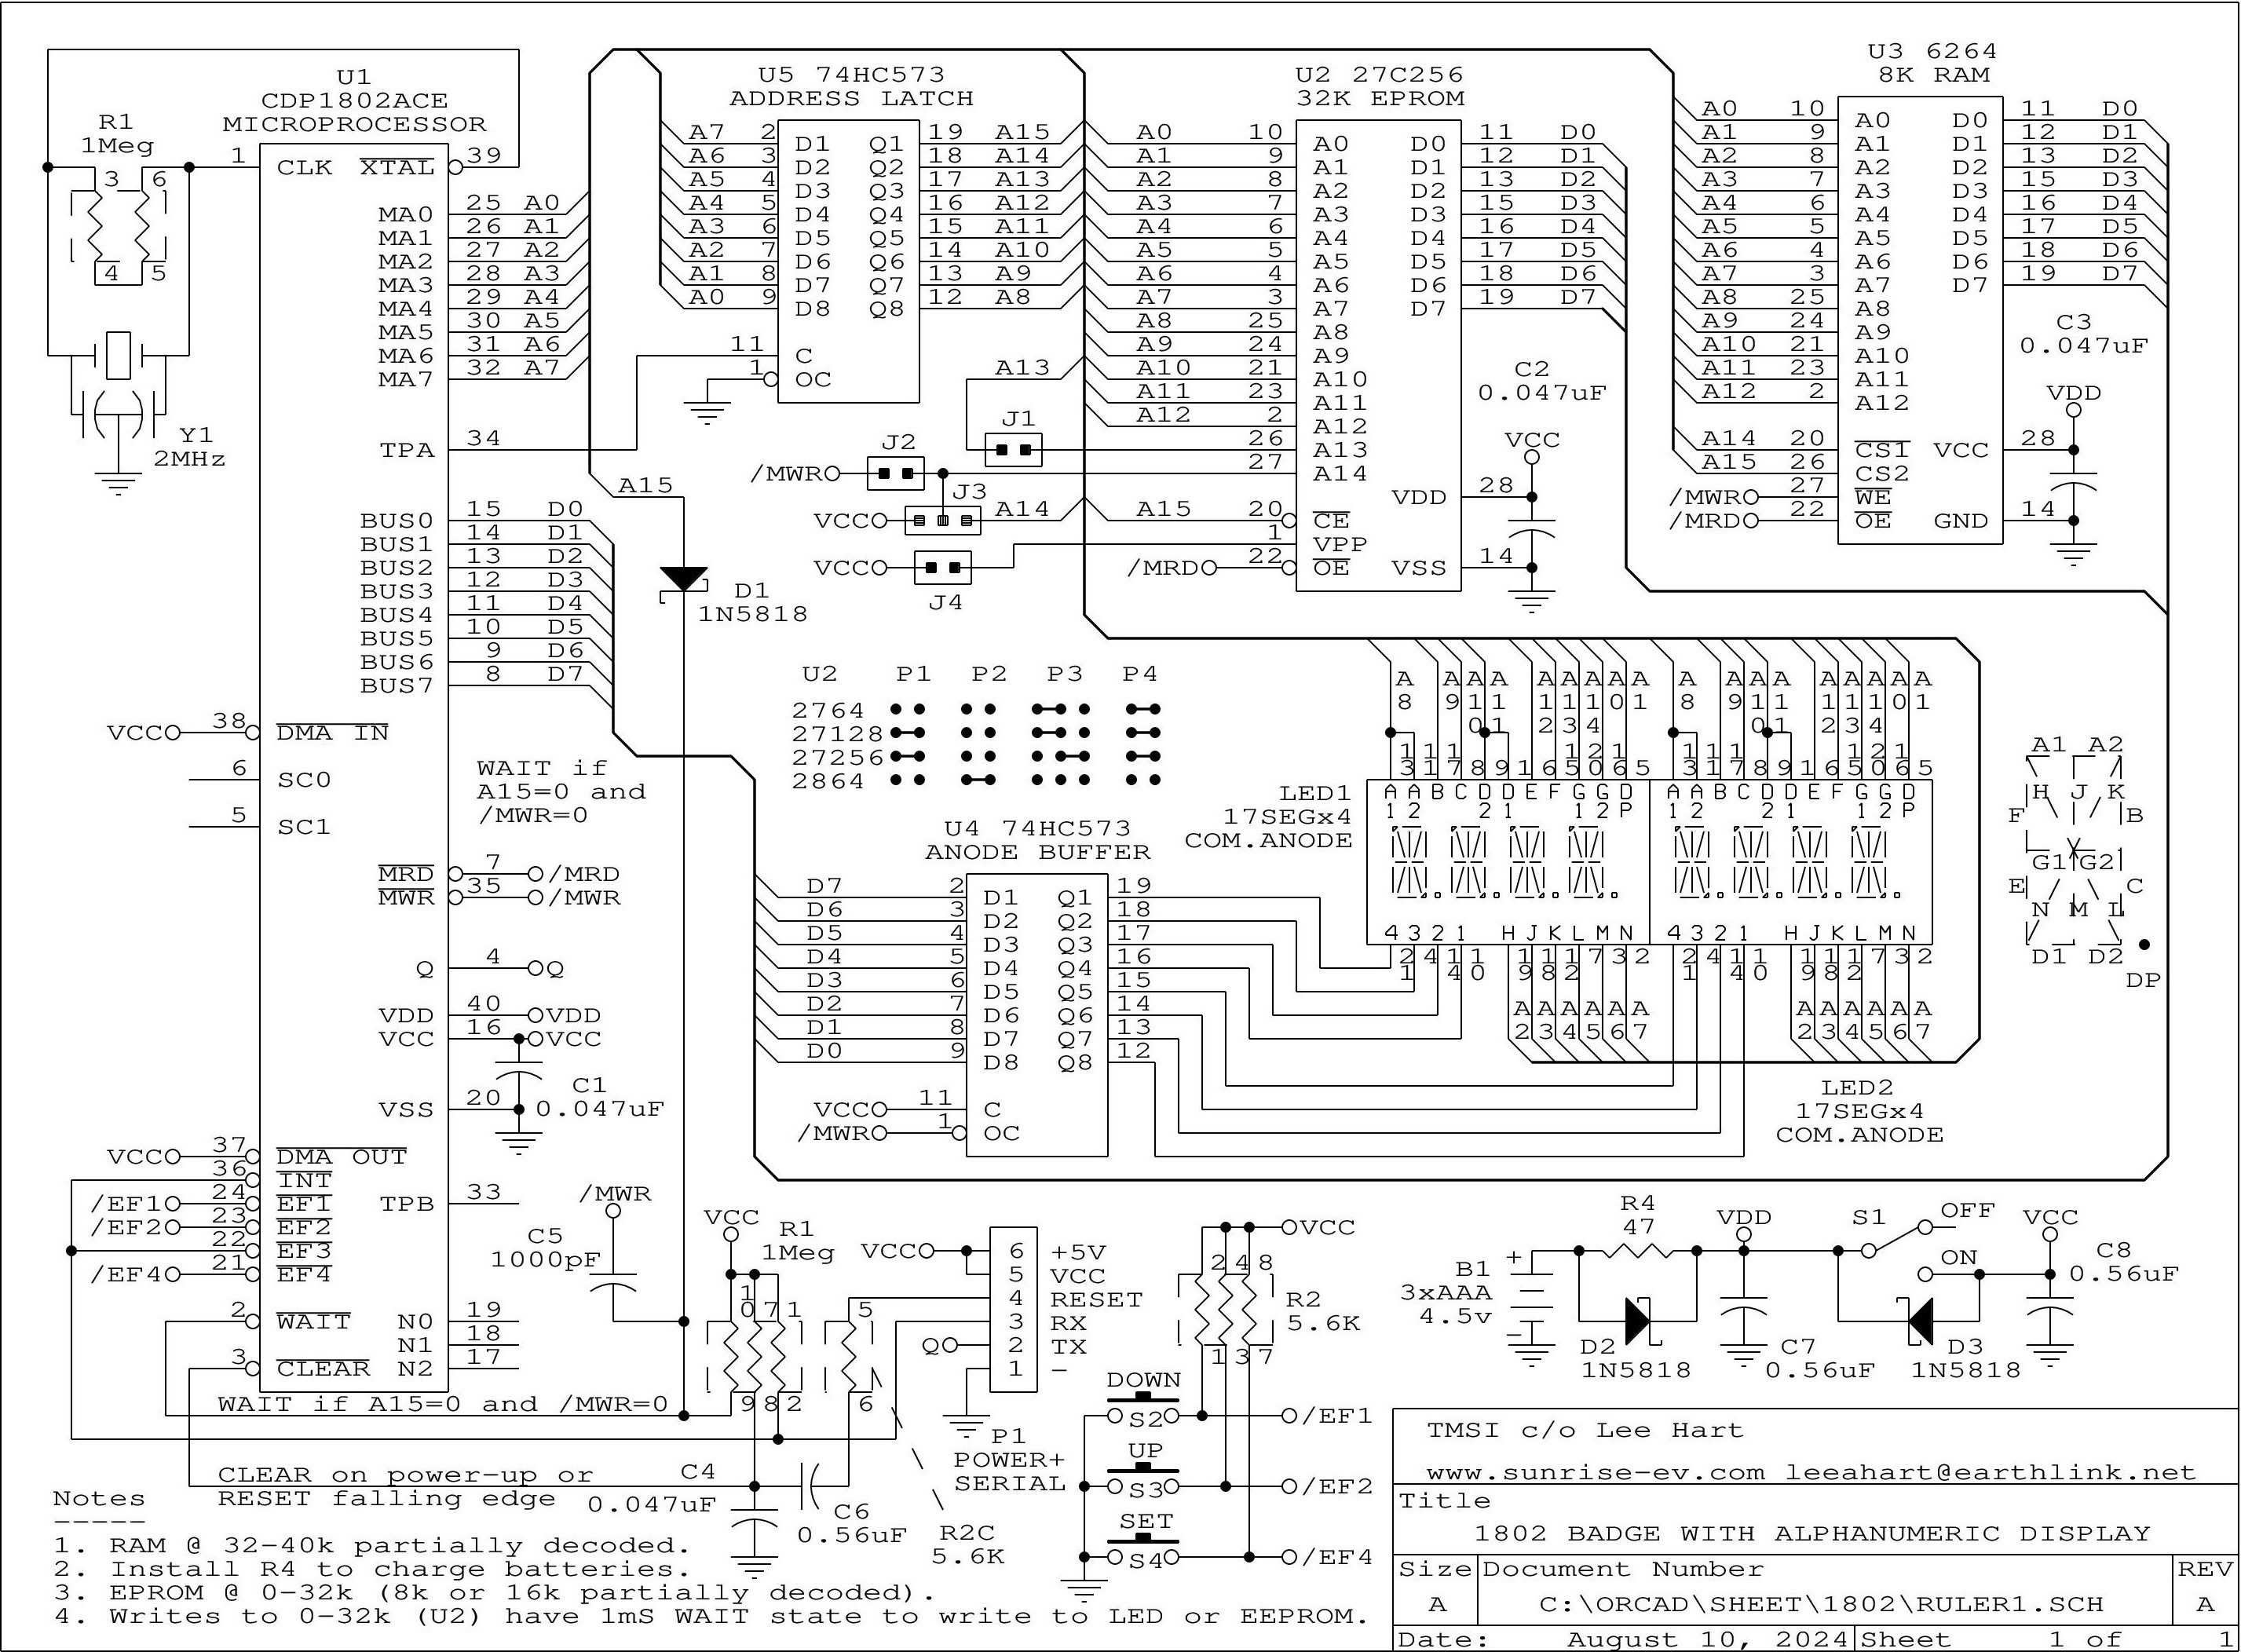
But there are vintage computer shows, too. It only makes sense to have a badge built with a vintage micro, built entirely with vintage components and techniques. The 1802 Badge is just such a project! It was designed for the 2024 Vintage Computer Show in Wall NJ.
The 1802 scans a multiplexed 8-character alphanumeric LED display to produce a 32-character scrolling message of your choice. The message can be entered with the on-board buttons, or from a PC running a Terminal program with a USB-serial TTL adapter. Once entered, the batteries retain the message without external power.
The circuit has an 1802, an EPROM with the program, and two 8-bit latches. Astute observers will note that there is no RAM! The 32-character message is stored entirely in the 1802's registers.
The kit comes with all parts, including rechargeable batteries, battery holder, and even a USB-serial adapter. But hurry -- I only have a few kits left from the VCF show!

This little project is an 1802 Name Tag. It shows just how much you can do with an 1802 and an absolute minimum of resources! It's the size of a credit card, and runs on just 10ma from three AAA cells (4.5v). That's low enough to run for days.
The 1802 scans a multiplexed 8-digit 7-segment LED display to produce four 8-character message "frames", displaying them sequentially about one every second. Every segment in each message is programmable, so it can spell out text as well as numbers.
In classic vintage fashion, messages are loaded with a 'front panel'. Since this is an 1802 computer, the front panel is nothing but switches and an LED.
The circuit has only an 1802, a 74HC241 octal buffer, and a 74HC138 1-of-8 decoder. Astute observers will note that there is no RAM or ROM! Yet it is running a program, and scanning the display.
This is a great "quickie" project! If you like puzzles, or enjoy trying to figure out how such a "mad" circuit works, click here for the manual, schematic, and more information.

Looking for a great Christmas "card" to highlight your electronics skill? Need the perfect gift for that electronics hobbyist or budding engineer? How about this electronic Christmas tree kit? (Click on the picture at right for a movie of the tree in action.)
It's a 6" high tree, decorated with colorful blinking lights. It's the perfect beginner's kit, with large parts, big pads, and wide traces for easy soldering (no tiny surface mount parts). The circuit board, detailed instructions, and all parts (except battery) are included. It runs on a standard 9 volt battery, which doubles as a stand. The clever micropower CMOS circuit operates for weeks. It even works with batteries too dead for anything else (so put your old smoke detector batteries back to work). Best of all, experience the joy of saying, "I made it myself!"

I made the original blinkie-LED Christmas Tree almost 40 years ago as a special gift for family and friends. I wrote an article on it for Modern Electronics magazine in 1988, and it's been widely copied (but never equalled) ever since.
Today's version has an improved shape, but is otherwise just like the classic original. Here is the manual that comes with the kit.
Tools needed: Wire cutters, a small screwdriver, solder, and a soldering iron or gun. US orders will be shipped by First Class Mail. Satisfaction guaranteed or your money back!

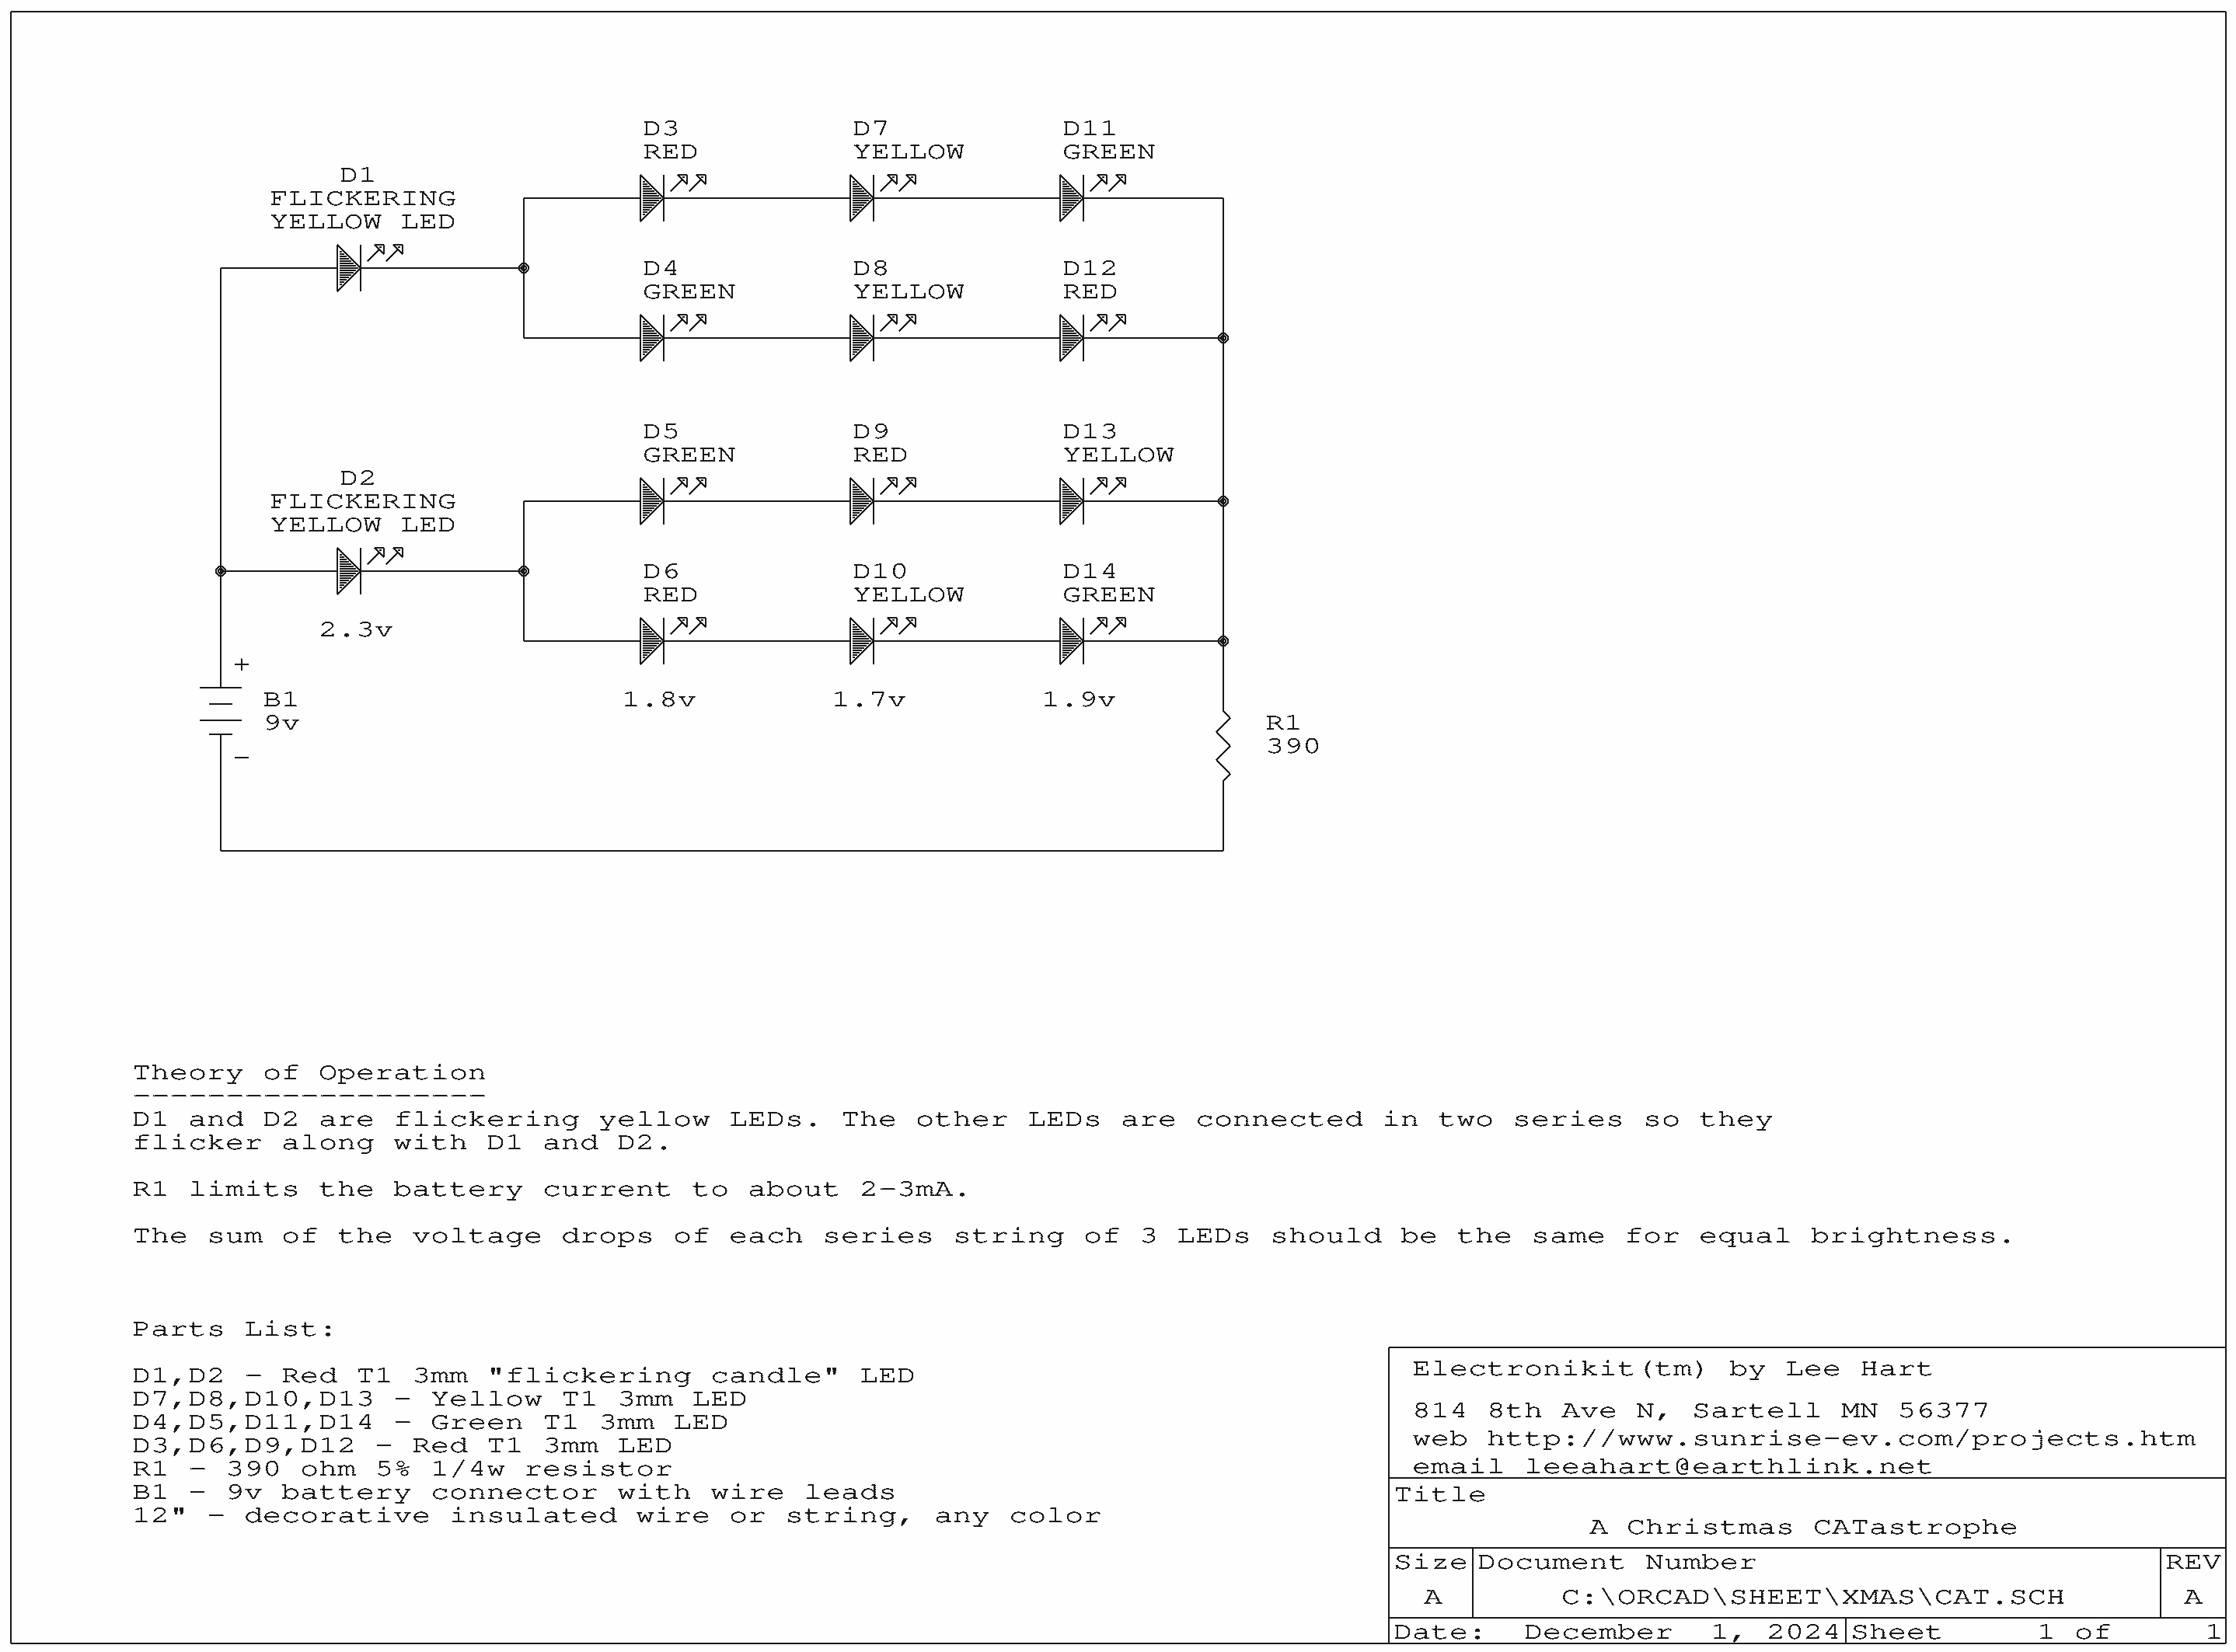
Oh no! The kitten climbed the Christmas tree again. He's fallen, and got himself tangled up in the lights!
Here's another Christmas "card" to show off your electronics skill. It's a 4" high cat-shaped circuit board, complete with colorful flickering lights. It comes as an easy-to-assemble kit, with large parts, big pads, and wide traces for easy soldering (no tiny surface-mount parts). The circuit board, all parts, and detailed instructions are included. It's a perfect gift for that electronics hobbyist or budding engineer on your list.It runs on a standard 9 volt battery (not included), which can be draped over a tree branch or sat on a shelf so everyone can see what that darn cat has gotten himself into this time.
Best of all, experience the joy of saying, "I made it myself!"
Tools needed: Wire cutters, a small screwdriver, solder, and a soldering iron or gun. US orders will be shipped by First Class Mail. As always, satisfaction is guaranteed or your money back!
Electronikit Projects © 2006-2026 by Lee A. Hart. Created 12/5/2013. Last update 2/15/2026.
Go to TOP ........
Go to HOME ........
Questions? Comments? Email me for details.
Web hosting provided by my good friend and brilliant computerist Jon "Sheer" Pullen.